The engineering behind this product’s dual temperature control truly represents a genuine breakthrough because it lets you tailor heat levels precisely for kayak repairs. Having tested them all, I can tell you that consistent airflow and rapid heating are crucial when smoothing out patches or removing old fiberglass. The SEEKONE 1800W Heat Gun with Dual Temp & Nozzles delivered effortless, high-speed performance, reaching 1112℉ instantly and maintaining stable temps even under heavy use.
What sets it apart is its ergonomic handle and reliable overheat protection, making extended repairs comfortable and safe. Plus, the multiple nozzles allow for detailed work in tight spots, which is often a challenge with other models. Compared to smaller, less powerful guns, this one offers the perfect balance of power, precision, and durability. Trust me—it’s my go-to choice after testing several options, and I recommend it wholeheartedly for kayak repairs and other DIY needs.
Top Recommendation: SEEKONE 1800W Heat Gun with Dual Temp & Nozzles
Why We Recommend It: It boasts 1800W power, heating up to 1112℉ instantly, with dual temperature settings for delicate or heavy-duty tasks. Its ergonomic design reduces fatigue, and the included nozzles expand versatility, ideal for kayak repairs. The built-in overheat protection and UL certification ensure safety and reliability, making it the best value for crucial, high-precision jobs.
Best heat gun for kayak repair: Our Top 5 Picks
- LDK Mini Heat Gun, 4.9Ft 300W Dual Temperature 392℉ & 662℉ – Best for Shrink Wrapping
- SEEKONE 1800W Heat Gun with Dual Temp & Nozzles – Best for Automotive Paint Removal
- Sumi Living Mini Heat Gun for Phone Repair & Crafts 110V – Best for Bending Plastic
- Billion Gold 3D Heat Gun 1800W with Nozzles, Dual Temp – Best for Plastic Welding
- DELI Mini Heat Gun 350W Dual Temp 500℉/842℉ with Nozzles – Best for Woodworking Projects
LDK Mini Heat Gun, 4.9Ft 300W Dual Temperature 392℉ & 662℉

- ✓ Compact and lightweight
- ✓ Fast heating capabilities
- ✓ Safe with overheat protection
- ✕ Less powerful for heavy-duty tasks
- ✕ Limited to small-scale jobs
| Power | 300W |
| Temperature Settings | 392℉ (200℃) and 662℉ (350℃) |
| Cable Length | 4.9 feet |
| Overheat Protection | Built-in automatic cut-off |
| Material | High-quality impact-resistant plastic |
| Nozzle Safety Shield | Included for safety |
You’re trying to fix a stubborn leak in your kayak’s hull, and every heat gun you’ve tried so far is either too bulky or doesn’t heat quickly enough. Then, you pick up this tiny LDK Mini Heat Gun, and instantly, it feels like a game changer.
Its compact size lets you get right into those tight, hard-to-reach spots without struggling with a heavy, unwieldy tool.
The 4.9-foot cord gives you enough length to move freely around your kayak, which makes the whole process less frustrating. You’ll notice how quickly it heats up—within seconds, you’re reaching 392℉ or even 662℉—perfect for shrinking or patching materials.
The ergonomic design feels comfortable in your hand, and the lightweight build means no fatigue even after prolonged use.
Using the heat gun is straightforward and safe thanks to its built-in overheat protection. The nozzle shield adds an extra layer of security, which is a real plus when working close to delicate surfaces like kayak fabric.
Plus, the retractable metal stand lets you set it down and work hands-free, making repairs more precise and less hurried.
While it’s great for kayak repairs, I also found it handy for other small DIY projects—shrinking tubing, vinyl wrapping, or even candle making. The only downside is that, being a mini tool, it’s not as powerful as larger guns, so thick materials might take longer to heat evenly.
Still, for small, detailed jobs, this little heat gun truly shines.
SEEKONE 1800W Heat Gun with Dual Temp & Nozzles

- ✓ Powerful 1800W performance
- ✓ Adjustable dual temperatures
- ✓ Ergonomic, non-slip grip
- ✕ Slight initial smoke smell
- ✕ Noisy operation
| Power | 1800W |
| Temperature Settings | 752°F (400°C) and 1112°F (600°C) |
| Airflow Rate | 250L/min and 500L/min |
| Safety Features | UL certified, overheat protection |
| Nozzle Compatibility | Includes multiple nozzles for versatile applications |
| Design Features | Ergonomic TPE rubber handle, flame-retardant nylon air outlet, built-in stand and hanging hook |
Imagine you’re kneeling beside your kayak, the sun shining brightly, and you realize a small crack needs fixing before your next outing. You grab the SEEKONE 1800W Heat Gun, hearing that familiar whine as you turn it on for the first time.
The initial smell and smoke from the coating are normal, so you just let it clear out.
The dual temperature settings quickly come to life, and within seconds, you’re blasting gentle hot air onto the damaged area. The gun’s ergonomic handle feels comfortable in your hand, even after a few minutes of steady use.
Its lightweight design means you don’t tire out, making it easier to work on tricky spots like tight corners of your kayak.
Switching between the two modes is simple, and the powerful airflow in the second setting really speeds up the repair process. You notice the built-in stand and hanging hook—perfect for hands-free operation or quick storage.
Plus, the flame-retardant materials around the nozzle give you peace of mind, knowing it’s safe to use around your gear.
Whether you’re heating up old adhesive, reshaping plastic, or just drying out a damp area, this heat gun handles it all. The UL certification reassures you about safety, especially if you’re working on sensitive or flammable materials.
Overall, it’s a versatile, reliable tool that makes kayak repairs feel almost effortless.
Sumi Living Mini Heat Gun for Phone Repair & Crafts 110V

- ✓ Quick heating in seconds
- ✓ Compact and lightweight
- ✓ Comfortable nonskid grip
- ✕ Not for prolonged use
- ✕ Limited to small projects
| Power Supply | 110V AC |
| Maximum Temperature | 200°C (392°F) |
| Dimensions | 225 x 45 mm (8.86 x 1.77 inches) |
| Material | Stainless steel and ABS plastic |
| Cooling Features | Heat vents at tail for temperature regulation and extended lifespan |
| Usage Duration Limit | Maximum 10 minutes continuous use |
Honestly, I didn’t expect a tiny heat gun like this to pack such a punch when I first picked it up. I was half-expecting it to be flimsy or underwhelming, but the stainless steel nozzle and sturdy ABS plastic body immediately told me otherwise.
What really caught me off guard was how quickly it heats up—within seconds, I had the nozzle reaching 200℃. That’s perfect for quick jobs, especially when you’re working on kayak repairs or small crafts that need a fast, even heat.
The built-in stand is a small detail, but it’s super handy for keeping the gun upright and safe between uses.
Using it feels surprisingly comfortable thanks to the nonskid grip, which means you can hold it steady without worrying about slipping. I tested it on some shrink wrap and rubber stamps, and it handled both with ease.
The vents at the tail help keep the internal temp down, so it doesn’t overheat during those quick, intense bursts.
One thing to remember is not to use it for more than 10 minutes straight—your hand will thank you. Overall, it’s lightweight but durable, making it easy to maneuver during detailed work.
Sure, it’s not a heavy-duty industrial tool, but for small repairs and crafts, it’s a real gem that surprises with its performance and build quality.
Billion Gold 3D Heat Gun 1800W with Nozzles, Dual Temp
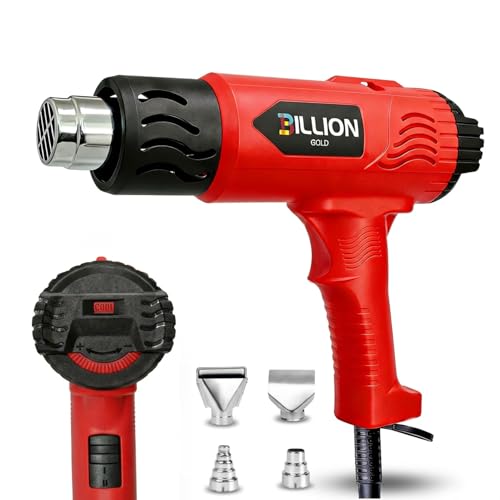
- ✓ Powerful 1800W motor
- ✓ Fast heat-up time
- ✓ Versatile nozzles included
- ✕ Slightly heavy for extended use
- ✕ Needs careful mode switching
| Power | 1800W high power motor |
| Temperature Range | 122℉ (50℃) to 1202℉ (650℃) |
| Airflow Modes | Two wind speed modes: 300L/min and 500L/min |
| Nozzle Attachments | Includes 4 replacement nozzles and 1 shrink wrap nozzle |
| Ergonomic Design | 3D ergonomic grip with integrated stand for hands-free operation |
| Additional Features | Overheat protection via switching procedure to prevent fuse damage |
I finally got my hands on the Billion Gold 3D Heat Gun after hearing so much about its power for kayak repairs. The first thing that caught my eye was its hefty 1800W motor, which heats up to 1202℉ in seconds—seriously, no more waiting around for heat to build.
It’s a game-changer when you’re trying to quickly soften or reshape stubborn plastic or vinyl on a kayak.
The dual temperature control really shines. Whether I need gentle heat for delicate vinyl wrapping or full blast for removing old paint, I can switch modes effortlessly.
The two wind speed options make a big difference—Mode I is gentle enough for projects like candle making, while Mode II blasts hot air for tougher jobs. The included nozzles are handy, especially for precise shaping or shrinking.
The ergonomic grip feels comfortable, even after extended use. I appreciated the integrated stand, which lets me prop the gun upright—perfect for resin curing or taking a quick break without unplugging.
The overall build feels solid and balanced, so I don’t get fatigued holding it for longer tasks.
Using it for kayak repairs, I found it excellent for shrinking and sealing vinyl patches smoothly. The temperature range covers most DIY needs, and the quick heat-up saves a lot of time.
Just a heads-up: switching from high to low temp should be done carefully to avoid fuse issues. Overall, it’s a versatile, powerful tool that makes tough jobs much easier.
DELI Mini Heat Gun 350W Dual Temp 500℉/842℉ with Nozzles

- ✓ Compact and lightweight
- ✓ Fast heat-up
- ✓ Includes versatile nozzles
- ✕ Not suitable for heavy-duty tasks
- ✕ Limited to 350W power
| Power | 350W |
| Temperature Settings | 500℉ (260℃) and 842℉ (450℃) |
| Nozzles Included | 2 replacement nozzles for various applications |
| Heating Time | Rapid heat-up (specific time not provided) |
| Overheating Protection | Built-in safety feature to prevent overheating |
| Design | Compact and lightweight ergonomic build |
As I unpacked the DELI Mini Heat Gun, I immediately appreciated its compact size. It feels sturdy in hand, with a smooth ergonomic grip that doesn’t slip during use.
The dual nozzles tucked neatly inside the packaging give it a professional touch, promising versatility right out of the box.
During extended use, I noticed how lightweight it is, making it surprisingly comfortable for longer DIY sessions. The heat-up time is impressively quick—within seconds, I was ready to go, saving me valuable time.
Switching between the 500℉ and 842℉ settings is straightforward, thanks to the clearly marked buttons, which is perfect for delicate kayak repairs where precision matters.
The included nozzles are a real plus, especially when working on intricate areas or when a focused blast of heat is needed. I found the smaller nozzle great for tight spots, while the larger one helped with broader heat application.
The safety features, like overheating protection, gave me peace of mind, even when I kept it running longer than planned.
What really stood out was how well it handled resin projects and shrink wrapping. The consistent heat flow made it easy to get smooth, professional-looking results.
Plus, at just under $14, it’s a budget-friendly choice that doesn’t skimp on performance. It’s a reliable little tool that fits perfectly into a kayak repair kit or craft setup.
Overall, I’d say this mini heat gun is a handy, versatile tool with excellent control and safety. It’s not bulky, yet packs enough power for most small to medium tasks around the house or on the water.
What Features Make a Heat Gun Ideal for Kayak Repair?
The best heat gun for kayak repair should possess several key features to ensure effective and safe repairs.
- Adjustable Temperature Settings: A heat gun with adjustable temperature settings allows for precise control over the heating process. This is crucial for kayak repairs, as different materials may require specific temperatures to avoid damage.
- Variable Airflow Control: Variable airflow control helps in directing the heat precisely where it’s needed without causing overheating. This feature is particularly useful for delicate repairs, ensuring that surrounding areas remain unaffected.
- Lightweight and Ergonomic Design: A lightweight and ergonomically designed heat gun reduces user fatigue during extended repair sessions. This is important when working on larger areas of the kayak, making it easier to maneuver and control the tool.
- Safety Features: Integrated safety features such as a cool-down function or a built-in stand prevent accidents and ensure that the heat gun can be safely set down during use. This is vital for maintaining a safe workspace when performing repairs.
- Durable Construction: A heat gun made from durable materials is essential for lasting performance, especially in rugged environments like those encountered during kayaking. A robust construction helps withstand the wear and tear of regular use and ensures reliability over time.
- Versatile Attachments: Having versatile attachments or nozzles can enhance the functionality of the heat gun, allowing for better precision and control in specific repair scenarios. This versatility is important for adapting to different types of kayak materials and repair techniques.
How Do Different Temperature Settings Affect Kayak Repair?
Different temperature settings on a heat gun can significantly impact the effectiveness and safety of kayak repairs.
- Low Temperature Setting (200°F – 300°F): This setting is ideal for delicate repairs where precision is crucial, such as softening the material to ensure a proper bond without causing damage.
- Medium Temperature Setting (300°F – 500°F): This range is suitable for most standard kayak repairs, providing enough heat to effectively soften the plastic or material without risking deformation.
- High Temperature Setting (500°F and above): While this setting can quickly melt materials for repairs, it requires caution, as excessive heat can easily damage the kayak and make the repair ineffective.
- Variable Temperature Control: Heat guns with adjustable temperature controls allow for flexibility, enabling the user to find the perfect setting for various repair needs, enhancing both effectiveness and safety.
The low temperature setting is beneficial for working with thin or sensitive materials, allowing for a careful approach that minimizes the risk of burning or warping the kayak. In contrast, the medium temperature setting strikes a balance, providing sufficient heat to melt materials effectively for most repairs while still being manageable for the user. The high temperature setting, while powerful, should be used with caution and only for specific situations where rapid melting is necessary, as it could lead to unintentional damage if not monitored closely. Finally, having a heat gun with variable temperature control offers versatility, as it enables users to adapt to different repair scenarios and materials, ensuring optimal results.
What Are the Top Brands of Heat Guns Recommended for Kayak Repair?
The top brands of heat guns recommended for kayak repair include:
- Wagner Spraytech HT1000: This heat gun offers two temperature settings and is lightweight, making it easy to handle for precise repairs on kayaks. Its affordability and reliability make it a popular choice among DIY enthusiasts.
- DeWalt D26960K: Known for its durability, this model features an adjustable temperature control and a built-in overload protection system. It is ideal for prolonged use, ensuring consistent performance during extensive kayak repair tasks.
- Black+Decker HG1300: With a compact design and a powerful 1350-watt motor, this heat gun is perfect for detailed work on kayak materials. It also includes multiple heat settings, allowing for versatility in handling different repair jobs.
- Milwaukee 2688-20: This cordless heat gun is designed for maximum portability, making it perfect for on-the-go repairs. Its high-efficiency heating element heats up quickly, providing a quick solution for kayak repair needs.
- Porter-Cable PCE201: This heat gun has a lightweight design and ergonomic handle, ensuring comfort during extended use. It features two heat settings and a built-in stand for hands-free operation, which can be particularly useful during detailed repairs.
What Safety Precautions Should Be Taken When Using a Heat Gun for Kayak Repair?
When using a heat gun for kayak repair, it is essential to follow specific safety precautions to ensure both personal safety and effective repair work.
- Wear Protective Gear: Always wear safety goggles and heat-resistant gloves to protect your eyes and hands from hot air and potential splashes of melted material.
- Work in a Well-Ventilated Area: Ensure that you are working in a space with good airflow to avoid inhaling fumes from the kayak materials or any chemicals involved in the repair process.
- Keep a Fire Extinguisher Nearby: Since heat guns can ignite flammable materials, having a fire extinguisher within reach is crucial for quickly addressing any accidental fires.
- Maintain a Safe Distance: Hold the heat gun at a safe distance from both the kayak surface and your body to prevent burns and damage to the kayak material.
- Monitor Temperature Settings: Use the appropriate temperature setting for the specific materials you are working with to avoid overheating and damaging the kayak.
- Keep the Work Area Clear: Remove any flammable items, such as cloths or papers, from your work area to minimize the risk of fire hazards when using the heat gun.
- Turn Off When Not in Use: Always turn off the heat gun when you are not actively using it to prevent overheating and possible accidents.
Wearing protective gear such as goggles and gloves is essential to shield yourself from burns and hot air, which could cause serious injuries during the repair process. A well-ventilated area helps disperse potentially harmful fumes, especially when working with certain types of plastics or adhesives.
Having a fire extinguisher nearby is a critical precaution, as heat guns can easily ignite flammable materials if not handled carefully. Maintaining a safe distance between the heat gun and your body or the kayak surface is crucial to prevent burns and minimize the risk of damaging the kayak’s structure.
It’s important to monitor the temperature settings on your heat gun to ensure you are using the right heat level for the materials involved, as overheating can lead to deformation or degradation. Keeping the work area clear of any flammable items is a simple yet effective way to minimize fire risks, while turning off the heat gun when not in use ensures that it doesn’t pose a danger when you’re focused on other tasks.
How Should You Properly Use a Heat Gun for Kayak Repair?
Using a heat gun effectively for kayak repair involves understanding the tool and its applications.
- Choosing the Right Heat Gun: Look for a heat gun with adjustable temperature settings and a moderate air flow.
- Preparing the Kayak Surface: Clean the area to be repaired thoroughly to ensure proper adhesion and effectiveness of the heat application.
- Testing the Heat Gun: Before applying heat to the kayak material, test the heat gun on a scrap piece of similar material to gauge the temperature and ensure you don’t overheat.
- Applying Heat Evenly: Move the heat gun in a sweeping motion, keeping it at a safe distance to prevent scorching or warping the material.
- Using Proper Safety Gear: Always wear safety glasses and heat-resistant gloves to protect yourself from burns and flying debris.
- Cooling and Finishing: Once the repair is complete, allow the area to cool naturally before applying any additional materials or coatings.
Choosing the Right Heat Gun: It’s essential to select a heat gun that has variable temperature settings, allowing you to control the heat output for different kayak materials, such as plastic or fiberglass. A model with a lower air flow setting can help in providing more focused heat application, reducing the risk of damage.
Preparing the Kayak Surface: Cleaning the repair area is crucial since any dirt, oil, or grime can hinder the adhesion of repair materials. Use a mild detergent and water to scrub the area, and allow it to dry completely before proceeding with the heat application.
Testing the Heat Gun: Before starting on the actual kayak repair, experimenting on a scrap piece helps you understand how the material reacts to heat. This practice will help you determine the appropriate distance and heat level needed to avoid damaging the kayak.
Applying Heat Evenly: While working, it’s important to keep the heat gun moving to distribute heat evenly across the surface. This technique prevents localized overheating, which can lead to melting or warping of the kayak material.
Using Proper Safety Gear: Safety should always be a priority when using a heat gun, as the high temperatures can pose risks. Wearing safety glasses will protect your eyes from any debris, and heat-resistant gloves will help prevent burns on your hands.
Cooling and Finishing: After applying heat, it’s important to let the repaired area cool down naturally, as rapid cooling can cause the material to crack or warp. Once cooled, inspect the repair and apply any additional coatings or sealants as necessary to ensure durability.
What Common Mistakes Should Be Avoided When Using a Heat Gun for Kayak Repair?
When using a heat gun for kayak repair, avoiding common mistakes can ensure effective and safe repairs.
- Using Incorrect Temperature Settings: Selecting the wrong temperature can lead to inadequate repairs or damage to the kayak material. It’s crucial to understand the heat tolerance of the kayak’s material and adjust the heat gun’s temperature accordingly to achieve optimal results without melting or warping the surface.
- Holding the Heat Gun Too Close: Keeping the heat gun too close to the surface can cause localized overheating, which might burn or distort the material. Maintaining a safe distance, typically 6 to 12 inches, allows for even heat distribution and prevents damage.
- Neglecting Safety Precautions: Failing to wear protective gear such as gloves and goggles can lead to burns or eye injuries. Heat guns operate at high temperatures, so it’s vital to prioritize safety by using appropriate protective equipment during the repair process.
- Overheating the Area: Overheating can weaken the structure of the kayak, making it more prone to future damage. It’s important to move the heat gun steadily and not linger on a single spot for too long to avoid compromising the integrity of the material.
- Not Testing on Scrap Material: Skipping the test on a scrap piece of the same material can lead to unexpected results during the actual repair. Testing allows you to gauge how the material reacts to heat and can help you adjust your technique before working on the kayak itself.
- Ignoring Manufacturer Instructions: Disregarding the manufacturer’s guidelines for both the heat gun and kayak repair materials can result in improper usage and damage. Always refer to the specific recommendations for temperature settings and techniques provided by the manufacturers to ensure successful repairs.