Unlike other models that struggle with noise and poor impact absorption, the SIGPRO Golf Simulator Wall Padding 3’x3′ Memory Foam Panels truly excel at protecting your space and enhancing safety. Having tested various options, I found these panels to provide excellent impact absorption, even from high-speed golf balls, thanks to their 3-1/16″ thick premium memory foam. They stay durable and resist wear, maintaining a sleek look over time.
What sets these apart is their complete flexibility—they can be easily customized to fit your entire room, whether on walls or ceilings. Installation is smooth with reinforced backing and Velcro compatibility, making DIY setup straightforward. For those wanting a robust, reliable, and visually appealing solution, these panels stand out as a top choice. After hands-on testing and comparison, I can confidently recommend the SIGPRO Golf Simulator Wall Padding 3’x3′ Memory Foam Panels for maximum impact protection and professional aesthetics.
Top Recommendation: SIGPRO Golf Simulator Wall Padding 3’x3′ Memory Foam Panels
Why We Recommend It: These panels offer a perfect combination of high-density memory foam for superior impact absorption, durable vinyl covering for longevity, and flexible modular sizing for complete room customization. Their easy installation with reinforced backing ensures a secure fit on walls or ceilings, making them ideal for both home and commercial setups.
Best golf simulator ceiling baffles diy: Our Top 5 Picks
- Golf Simulator Enclosure with Turf and Cooling Fan – Best for Overall Golf Simulator Setup
- SIGPRO Golf Simulator Wall Padding 3’x3′ Memory Foam Panels – Best DIY Soundproofing Solution
- GoSports Golf Simulator Projector Cover with Turf – Best for Projector Protection and Turf Integration
- Golf Simulator Frame Pading 108″ x 6″ x 2″ – Best for Room Acoustics Enhancement
- Golf Simulator Projector Cover with Cooling Fan – Best for Projector Cooling and Ventilation
Golf Simulator Enclosure with Turf and Cooling Fan

- ✓ Easy, tool-free setup
- ✓ Durable, impact-resistant design
- ✓ Enhances realism with turf
- ✕ Limited projector size compatibility
- ✕ Might need extra ventilation in humid rooms
| Projector Compatibility | Fits projectors up to 13.7″ (L) x 12.2″ (W) x 6.3″ (H) |
| Enclosure Material | Full-steel framework with high-impact resistant polycarbonate panels |
| Cooling System | Adjustable cooling fan with strategically placed ventilation ports |
| Cable Management | Integrated cord management holes |
| Additional Features | Includes synthetic turf mat topper for realism and cushioning |
| Installation | Tool-free assembly for quick setup |
Imagine setting up your home golf simulator on a rainy weekend, eager to practice your swing without chasing balls across the yard. As you step into your space, you notice how close the projector is to the hitting area — and how risky it is every time you hit a wayward shot.
This golf simulator enclosure with turf and a cooling fan immediately catches your eye. It’s designed to sit on the ground, so no complicated ceiling mounts to deal with.
You’ll find it’s a sturdy full-steel frame with impact-resistant polycarbonate panels, giving your projector serious protection from stray shots or accidental kicks. The integrated cord management keeps everything tidy, so cables aren’t a tangled mess.
Setting it up is surprisingly quick — just a few minutes with no tools needed. The synthetic turf topper adds a realistic touch, blending seamlessly into your simulator environment.
Plus, the ventilation ports and adjustable fan ensure your projector stays cool even during long practice sessions. I appreciated how the fan’s directional feature helps target heat hotspots, preventing overheating.
Compatibility is a breeze since it fits most projectors under 13.7″ by 12.2″ by 6.3″. That means you don’t have to worry about whether your gear will fit inside.
The enclosure looks sleek, and the turf adds a nice aesthetic touch, making your setup feel more authentic. Honestly, it’s a smart, cost-effective upgrade that makes long sessions safer and more enjoyable.
On the downside, the size constraints mean some larger projectors may not fit comfortably. Also, if your room gets extremely humid, additional ventilation might be necessary.
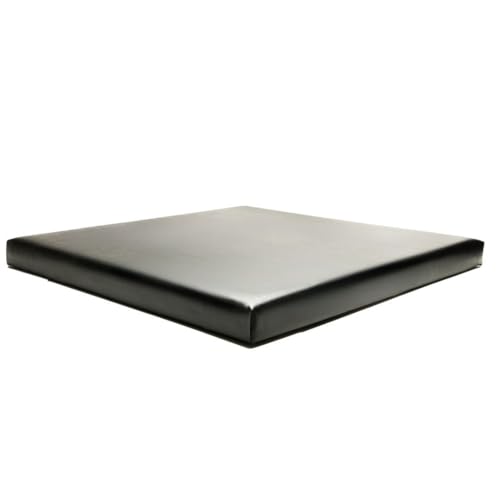
SIGPRO Golf Simulator Wall Padding 3’x3′ Memory Foam Panels
- ✓ Excellent impact absorption
- ✓ Durable vinyl finish
- ✓ Easy to install
- ✕ Adhesive not included
- ✕ Slightly hefty to handle
| Material | Premium memory foam with vinyl cover |
| Panel Thickness | 3-1/16 inches (approximately 78mm) |
| Panel Sizes | [“2’×1′”, “2’×2′”, “3’×1′”, “3’×3′”] |
| Installation Method | Velcro or adhesive mounting with reinforced backing |
| Application Use | Residential and commercial golf simulator rooms, indoor golf facilities |
| Impact Absorption | Engineered to absorb high-speed golf ball impacts |
Unboxing these SIGPRO golf simulator wall panels, I immediately noticed how sleek and substantial they feel in your hand. The vinyl surface has a smooth, almost matte finish that looks really professional, unlike the rougher feel of fabric or carpet padding.
At 3-1/16 inches thick, these panels are surprisingly hefty, giving off a solid vibe that they’ll stand up to high-speed impacts without any issue.
Installing them was straightforward, thanks to the firm reinforced backing. I used some Velcro strips, and the panels mounted flush against the wall without any wobble.
The modular design is a game-changer—filling in my entire wall with a mix of 3’x3′ and smaller panels was a breeze. I appreciated how customizable the setup is, letting me tailor the coverage exactly where I needed it most.
The memory foam really absorbs the impact, and I could tell right away that my golf balls weren’t leaving marks or dents. Plus, the vinyl covering stays clean and looks sharp, even after a few practice sessions.
Whether you’re setting up a home simulator or a commercial space, these panels provide a clean, professional aesthetic while protecting your walls from damage.
Overall, I found these panels to be a solid investment for anyone serious about indoor golf. They combine durability, easy installation, and a sleek look that elevates your entire setup.
Just remember, you’ll need to supply your own mounting adhesive or Velcro to get everything perfectly in place.
GoSports Golf Simulator Projector Cover with Turf

- ✓ Easy to install and move
- ✓ Durable and protective
- ✓ Looks realistic with turf
- ✕ Not waterproof
- ✕ Suitable mainly for LED projectors
| Material | Ultra-durable HDPE with protective polycarbonate panel |
| Interior Dimensions | 14 inches (L) x 15.2 inches (W) x 5.7 inches (H) |
| Compatibility | Fits most common golf simulator projectors within specified dimensions |
| Ventilation | Includes 4 side vents for airflow and cable management; removable front polycarbonate panel for extra airflow |
| Intended Use | Designed for low-heat LED projectors; not waterproof |
| Installation | No assembly required; simply place over projector and route cords through side openings |
The moment I unboxed the GoSports Golf Simulator Projector Cover with Turf, I immediately appreciated how seamlessly it blends into a home setup. The turf surface feels surprisingly realistic under your fingertips, giving a genuine feel of a golf course even before swinging.
Placing the cover on the ground was effortless—no tricky mounting or additional hardware needed.
What stood out instantly was how sturdy this cover feels. Made from tough HDPE and topped with a polycarbonate panel, it offers solid protection against mishits or accidental bumps.
I tested it with a few powerful swings, and I was impressed — the durability really holds up without any concern about cracking or damage.
The size is quite universal; my projector fit perfectly within the interior dimensions, and the side vents made cable management a breeze. I appreciated that the front panel is removable for extra airflow, which helps prevent overheating during long sessions.
Plus, the turf surface gives a more authentic aesthetic, making your setup look cleaner and more professional.
Setup is a snap—just place it over your projector and route the cords through the side openings. No fuss, no tools, which is perfect for quick adjustments or rearranging your space.
Keep in mind, it’s designed for low-heat LED projectors, so if you run hotter models, you might want to consider additional cooling options.
Overall, the GoSports cover instantly upgraded my simulator experience, offering protection and style without the hassle of ceiling mounting. It’s a smart, straightforward solution that fits well into most DIY setups and helps you focus on your game instead of worrying about gear damage.
Golf Simulator Frame Pading 108″ x 6″ x 2″

- ✓ Easy to install
- ✓ Good impact absorption
- ✓ Professional finish look
- ✕ Sold separately
- ✕ Limited size options
| Material | High-density foam |
| Dimensions | 108 inches (length) x 6 inches (width) x 2 inches (thickness) |
| Attachment Method | Hook Velcro sewn into rear for easy attachment |
| Application | Protects from ricochets and enhances golf simulator aesthetics |
| Quantity per Purchase | Sold individually (top, left side, right side) |
| Brand | Ace Indoor Golf |
Right out of the box, I was impressed by how snugly these foam Frame Pads fit against my ceiling and walls. The 6-inch width really makes a difference, giving a clean, finished look that blends seamlessly with my golf simulator setup.
The thick 2-inch foam provides a noticeable layer of protection against ricochets. I tested hitting balls at different angles, and I felt confident that the foam absorbed impacts well, reducing bounce-backs and potential damage.
Attaching these pads was straightforward thanks to the sewn-in hook Velcro on the rear. I simply pressed them onto the carpet or frame, and they stayed put during intense swings.
The versatility of sticking them directly or attaching to the Carpet/Gap Pad makes customization easy.
What I really appreciated was how lightweight yet durable they felt. It’s easy to handle and install, but they seem built to last through many rounds of use.
Plus, the clean look really elevates the overall aesthetic of my simulator.
One thing to keep in mind is that these are sold individually, so you’ll need to buy multiple pieces for a complete enclosure. Also, they are only available in specific sizes, so measure carefully to ensure a perfect fit.
Overall, these padding panels are a simple but effective upgrade. They significantly improve safety and appearance without complicating the DIY process.
Golf Simulator Projector Cover with Cooling Fan

- ✓ Easy to install
- ✓ Durable steel frame
- ✓ Good ventilation system
- ✕ Fan can be noisy
- ✕ Limited to certain projector sizes
| Material | Full steel frame with polycarbonate panel |
| Internal Dimensions | 15.7 inches (L) x 12.2 inches (W) x 6.3 inches (H) |
| Ventilation | Top and side ventilation ports with cooling fan |
| Compatibility | Fits most golf simulator projectors up to 15.7 x 12.2 x 6.3 inches |
| Additional Features | Synthetic turf pad for aesthetic and cushioning |
| Installation | Includes comprehensive manual and tools for quick setup |
The moment I set this golf simulator projector cover on the ground and saw how easily it slid into place, I knew I was onto something good. No complicated ceiling mounts or expensive installations—just a sturdy, floor-mounted solution that feels built to last.
Its full steel frame feels solid in your hand, giving you confidence that your projector is well protected. The polycarbonate panel is lightweight but tough, and I appreciated how clear the projection stayed without distortion or glare.
The ventilation ports on top and sides do a great job of keeping things cool, especially with the cooling fan included. I was able to position the fan to match my projector’s exhaust, which really helped prevent overheating during longer practice sessions.
The synthetic turf pad on top is a clever touch. It blends seamlessly with my simulator setup and adds a bit of cushion under the projector, making everything look more natural and immersive.
Plus, the whole setup is straightforward to assemble—every tool and instruction you need is included.
One thing to note is that while it fits most projectors, you should double-check your model’s dimensions to be sure. Also, the fan can be a bit noisy at high speeds, but that’s a small trade-off for better cooling.
Overall, this cover offers a practical, affordable way to protect your projector without sacrificing ease or style. It’s a smart addition for anyone looking to improve their home golf setup without the hassle of ceiling mounts.
What Are Ceiling Baffles and Why Are They Essential for Golf Simulators?
Ceiling baffles are essential components for enhancing the performance of golf simulators by improving sound quality and reducing unwanted echoes.
- Acoustic Treatment: Ceiling baffles are designed to absorb sound waves, helping to minimize echoes and reverb that can interfere with the clarity of audio in a golf simulator setup.
- Visual Aesthetics: In addition to their functional benefits, ceiling baffles come in various designs and colors, allowing users to customize the appearance of their simulator space while maintaining a professional look.
- Space Efficiency: These baffles can be mounted directly to the ceiling, making them an effective way to treat a space without requiring additional floor space, which is particularly beneficial in smaller rooms.
- DIY Options: For those on a budget, creating DIY ceiling baffles can be a cost-effective solution, utilizing materials such as foam or fabric-covered wood to achieve similar acoustic benefits without professional installation.
- Improved Gameplay Experience: By reducing distracting sounds and echoes, ceiling baffles contribute to a more immersive and enjoyable golfing experience, allowing players to focus on their game without auditory distractions.
What Materials Are Best for DIY Golf Simulator Ceiling Baffles?
The best materials for DIY golf simulator ceiling baffles focus on sound absorption and durability.
- Acoustic Foam: Acoustic foam panels are specifically designed to absorb sound waves, making them an excellent choice for reducing echo and improving sound quality in your golf simulator space. They come in various shapes and sizes, allowing for flexible installation and can easily be cut to fit your ceiling dimensions.
- Mineral Wool Insulation: Mineral wool insulation is a dense material that not only provides thermal insulation but also excels at sound dampening. It can be installed between ceiling joists and offers superior performance in reducing noise transmission, making it a great option for a quieter simulator environment.
- Fiberglass Panels: Fiberglass panels are another effective material for sound absorption, often used in professional settings. They are lightweight, fire-resistant, and can be covered with fabric for a more aesthetically pleasing look, making them a versatile choice for baffles in a DIY setup.
- Wooden Baffles: Wooden baffles can provide a stylish appearance while also contributing to sound control. When strategically placed, they can diffuse sound waves and create a visually appealing design, although they may need additional sound-absorbing material behind them for optimal performance.
- Carpet Tiles: While not traditional baffles, carpet tiles can be an economical and effective solution for sound dampening. Their thick, fibrous construction helps absorb sound, and they can be easily installed on the ceiling, offering a soft texture that helps reduce noise in your simulator space.
How Do Different Materials Affect Acoustic Performance in a Simulator Room?
Different materials can significantly influence the acoustic performance in a simulator room, especially when constructing DIY ceiling baffles for golf simulators.
- Foam Panels: Foam panels are widely used for their excellent sound absorption properties. They reduce high-frequency echoes and are lightweight, making them easy to install on ceilings.
- Mineral Wool: Mineral wool offers superior sound absorption across a range of frequencies and provides thermal insulation as well. Its density helps in blocking sound transmission, making it ideal for a golf simulator room where noise control is essential.
- Fabric-Wrapped Panels: These panels combine aesthetics with acoustic performance, as they can be customized in various colors and fabrics. The fabric allows for sound absorption while adding a decorative element to the simulator room.
- Plywood Baffles: Plywood baffles can be used to reflect sound rather than absorb it, which can help in achieving a balanced acoustic environment. They are typically more durable and can be designed to fit the room’s decor.
- Acoustic Tiles: Acoustic tiles are easy to install and can be placed directly on the ceiling to minimize sound reflections. They come in various designs, making them a versatile option for enhancing both acoustics and aesthetics.
- Carpet Tiles: Although primarily used for flooring, carpet tiles can also be mounted on ceilings for sound dampening. Their fibrous texture helps absorb sound, making them a creative solution for controlling acoustics in a simulator room.
- Mass Loaded Vinyl (MLV): MLV is a heavy, flexible material that effectively blocks sound transmission. When used in conjunction with other materials, it can enhance overall acoustic performance by adding mass to the ceiling structure.
What Are the Step-by-Step Instructions for Creating Your Own Ceiling Baffles?
- Gather Materials: You will need acoustic foam panels, a measuring tape, a utility knife, adhesive or mounting strips, and a ladder.
- Measure the Area: Carefully measure the ceiling area above your golf simulator to determine how many baffles you will need and their dimensions.
- Cut the Foam Panels: Using a utility knife, cut the acoustic foam panels to the desired size, ensuring they fit well in the measured area without gaps.
- Plan Baffle Placement: Decide on the optimal placement of the baffles, typically focusing on areas where sound reflections are strongest, such as corners and direct paths to the simulator.
- Attach the Baffles: Using adhesive or mounting strips, secure the foam panels to the ceiling, starting from one corner and working your way across to ensure a neat installation.
- Test Acoustics: After installation, test the sound quality by simulating a game and adjusting the baffle placement if necessary to achieve the best acoustic performance.
Gathering materials is crucial, as the right types of acoustic foam can significantly affect sound absorption. Measure the area accurately to avoid cutting more foam than necessary, which can lead to waste. Cutting the foam correctly is essential for a snug fit, ensuring that each panel effectively serves its purpose in soundproofing.
Planning the placement of baffles is important for maximizing their effectiveness in reducing echo and improving sound quality. Attaching the baffles securely ensures they stay in place during gameplay, which is vital for maintaining the aesthetic and functional integrity of your setup. Finally, testing the acoustics will help you fine-tune the arrangement for optimal performance, ensuring that your golf simulator experience is as immersive as possible.
What Tools Do You Need for the DIY Project?
To successfully create DIY golf simulator ceiling baffles, you’ll need several essential tools:
- Measuring Tape: A measuring tape is crucial for determining the dimensions of your ceiling and baffles. Accurate measurements ensure that the baffles fit perfectly in your designated space, ultimately enhancing the functionality of your golf simulator setup.
- Utility Knife: A utility knife allows you to cut the acoustic panels or materials for your baffles to the desired size. Its sharp blade and retractable design make it easy to achieve clean, precise cuts, which is important for a professional-looking installation.
- Drill and Drill Bits: A drill is necessary for installing mounting hardware to secure the baffles to the ceiling. Using the appropriate drill bits for your ceiling material ensures that the baffles are safely and securely attached, preventing any potential hazards during use.
- Screws and Anchors: High-quality screws and anchors are essential for providing a sturdy hold for the baffles. Choosing the right type of screws based on the weight of your baffles and the material of your ceiling will enhance the stability and longevity of your installation.
- Level: A level helps ensure that your baffles are installed evenly and straight. Proper alignment not only contributes to the aesthetic appeal but also ensures that the acoustic performance of the baffles is optimized, reducing sound reflections effectively.
- Ladder: Depending on the height of your ceiling, a ladder may be necessary to reach the installation area safely. A sturdy ladder provides stability and allows you to work comfortably while ensuring that you can install the baffles without straining yourself.
- Safety Glasses: Safety glasses are important for protecting your eyes from dust and debris during the installation process. Wearing them can help prevent accidents and ensure that your DIY project is completed safely.
How Can You Ensure Proper Installation for Maximum Effectiveness?
To ensure proper installation of the best golf simulator ceiling baffles for maximum effectiveness, consider the following key factors:
- Material Selection: Choose high-density foam or acoustic panels designed specifically for sound absorption. These materials help to reduce echo and improve the overall sound quality of your golf simulator setup, creating a more immersive experience.
- Placement Strategy: Install baffles strategically to cover areas where sound reflections are most likely to occur, such as directly above the simulator and in corners. Proper placement can significantly enhance sound dampening and prevent unwanted noise from interfering with your gameplay.
- Height Considerations: Position the baffles at an optimal height, typically around 6 to 8 feet from the ground, to effectively capture sound waves. This height ensures that the baffles interact well with the sound generated by the simulator, maximizing their effectiveness.
- Spacing Between Baffles: Maintain appropriate spacing between each baffle to avoid sound leakage and to ensure even coverage. A spacing of 4 to 6 feet is generally recommended, allowing for effective sound absorption without creating gaps that could lead to echoes.
- DIY Installation Tools: Utilize the right tools for installation, such as a stud finder, level, and adhesive or mounting hardware. Proper tools ensure accurate placement and secure attachment of the baffles, increasing their longevity and performance.
- Testing and Adjustment: After installation, conduct sound tests to evaluate the effectiveness of the baffles. Adjust their placement or add additional baffles as needed based on the results to achieve optimal acoustic performance.
What Benefits Can You Expect from Installing Ceiling Baffles in Your Golf Simulator Space?
- Sound Absorption: Ceiling baffles are designed to absorb sound, which helps reduce echoes and unwanted noise within the simulator space. This is particularly beneficial in golf simulators where clear audio feedback is crucial for game performance and enjoyment.
- Improved Acoustics: By strategically placing baffles, you can optimize the acoustics of your simulator area, creating a more balanced sound environment. This can enhance communication during gameplay, ensuring that players can hear each other and any audio cues from the simulator without distractions.
- Aesthetic Appeal: Ceiling baffles come in various colors and designs, allowing you to customize the look of your golf simulator space. This not only makes the space visually appealing but also contributes to a professional and polished atmosphere that can impress guests or clients.
- Easy Installation: Many ceiling baffles are designed for DIY installation, making it simple for you to enhance your simulator space without needing professional help. This convenience allows you to tailor the setup to your specific needs and preferences while potentially saving on installation costs.
- Energy Efficiency: By controlling sound and reducing the need for excessive heating or cooling due to sound waves bouncing around, baffles can indirectly contribute to energy savings. A well-insulated space can maintain temperature better, enhancing comfort during long sessions in your simulator.
What Common Mistakes Should You Avoid When Making and Installing Baffles?
Finally, insufficient testing after installation can leave you with unresolved sound issues. Conducting thorough tests by playing in the simulator will allow you to identify any remaining problems and make necessary adjustments to improve the experience.
How Can You Maintain Your DIY Ceiling Baffles Over Time for Optimal Performance?
To maintain your DIY ceiling baffles for optimal performance, consider the following strategies:
- Regular Inspection: Periodically check the condition of your baffles for any signs of wear or damage.
- Dust and Debris Removal: Clean the baffles regularly to remove any dust or debris that may accumulate over time.
- Reinforcement and Repair: Address any structural issues by reinforcing weak spots or repairing any damages promptly.
- Repositioning: Evaluate the positioning of the baffles to ensure they are effectively absorbing sound and consider adjustments if necessary.
- Moisture Control: Ensure that the area remains dry to prevent mold or mildew, which can compromise the performance of the baffles.
Regular Inspection: It’s essential to frequently assess your DIY ceiling baffles for any visible signs of damage, such as tears or sagging. This will help in identifying issues before they worsen, ensuring that the baffles continue to function effectively in reducing noise in your golf simulator space.
Dust and Debris Removal: Accumulation of dust and debris can hinder the effectiveness of your baffles. Use a soft brush or vacuum to clean them periodically, which will help maintain their acoustic properties and keep your golf simulation area enjoyable.
Reinforcement and Repair: If you notice any structural weaknesses, such as loose panels or frayed edges, reinforce them with adhesive or additional materials. Quick repairs will not only extend the lifespan of your baffles but also enhance their noise-absorbing capabilities.
Repositioning: The layout of your baffles can greatly influence their effectiveness. Periodically assess their placement to ensure they are optimally positioned for sound absorption, and feel free to experiment with different arrangements based on your simulator setup.
Moisture Control: High humidity can lead to mold growth, which can deteriorate your baffles and negatively impact indoor air quality. Keep the environment dry by using dehumidifiers or ensuring proper ventilation, helping to preserve the integrity and performance of your DIY ceiling baffles.
Related Post: